Home  |  As Featured On  |  Advertising  |  Parties I Like!  |  Contact Me  |  About  |  Shop


Sunday, February 28, 2010

Decorated Dress Form

My mom and Aunt had the idea to make decorated dress forms. When they asked me if I would like to join in, even though I had no idea what to use it for, I agreed. (Hello!- -addicted to crafting much?) After we finished (it took two days), I absolutely loved mine!

This is a LONG tutorial, full of pictures. If you want to see the end product, or if you hate the suspense, scroll down!

We started with table-top dress forms from Hobby Lobby. I have seen them at Michael's and JoAnn's too. We used gesso to create a nice, even base color.


We then used some strips of watercolor paper that my Grandma had previously painted on and we tore them down the middle. We did this because we wanted them thinner- you could have whatever size you want. I didn't cut them because I like the ripped look.


Some of these strips of paper we thought would look cool if we embossed them with our CuttleBug machine. Here is a picture of cute Grandma learning what the CuttleBug does.


After that, our gesso was dry, so we painted our dress forms. I chose the color pink just for the fun of it. You could use any color. I also wanted a metallic look so the craft paint I used was a pink metallic.


I also added some other colors lightly here and there.


From there I ripped some images (found online) of old tape measures to match the already ripped water color paper. You can use real ones if you have them! This step is optional.


After the paint dried, I ripped tissue paper and modge podged it to the dress form in various places.


Then, to add more decoration, I glued little diamond shapes in various places on the dress form.


I also glued little heart-shaped sequins into the middle of my diamonds.


Using iron-on transfer paper that we printed from the computer, I chose words, names, dates, and addresses that are special to me and printed them in a pretty font. Then I ironed them onto a scrap of fabric.


Rip or cut the fabric into strips (just like earlier with the watercolor paper and the measuring tape images).


Now you are finally ready to start gluing on your dress form's skirt!


And keep gluing and building layer after layer of watercolor paper, fabric, measuring tape, lace, ribbon, anything!


Eventually, it will end up the way you want it. Code for: put as much as you like on/in her skirt. I think at this point I looked over at my Aunt and caught her talking to her dress form telling her how lovely she is.

Here are the three "ladies" well on their way to bea-u-ti-ous!! (Not to mention that messy table!)


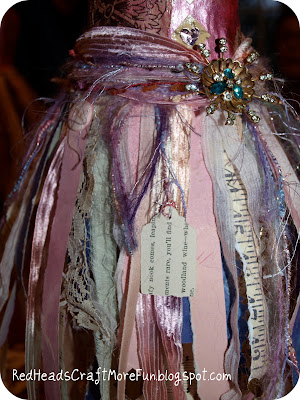
Then start to embellish her skirt. Use buttons, paper cut-outs (hearts, diamonds), tags, anything! We cut out some tags from an old poetry book using our Cricut. Here is a close up of my embellishments, sorry about the shadow of my head.


We attached and glued the tags to the waist with pretty fibers.


I also used the same fiber to wrap a "scarf" around her neck.


I wrapped the same fiber (along with others) around her waist. I finished it off with an antique broach.


Here they are all completed!


I think I am going to either put mine in my bedroom to hang jewelry on, or put her in my craft room. I can't decide!


Remodelaholics Anonymous at Remodelaholic

Saturday, February 27, 2010

My First Award!

Honestly, where are my manners?? I can't believe I let this go for SO long- please excuse my rudeness!! A few weeks ago, I received notification from Shannon at One Crafty Mommy (adorable blog, by the way) that I WON this:


Seriously??! I am SO excited. The more I blog, the more I feel like I am the lucky neighbor who has moved into the BEST, most supportive, funnest (yes I actually used that word) neighborhood ever. Lucky me! So, thank you very much Shannon, you are so sweet and I am sorry it took me so long to acknowledge this award.

The rules for accepting this award are:

1.Thank (and link to) the person that gave you the award
2.Pass this award on to 15 bloggers you've recently discovered & whom you think are fantastic
3.Contact said Blogs to let them know they've won
4.State 7 Things about yourself!

I wish I could give this to EVERY blog I read on a daily basis, but I guess I will follow the rules for now... and if you see your name and already got this award, just smile, pat yourself on the back and say "I am good!"

1. Karin at a Window Into Whimsy
5. Lori at Life as Lori
7. The Sassy Duo at Sassy Style Redesign
8. Michelle at A Little Tipsy
10. Ashley at Make it and Love it
11. Kirstin and Jordan at KoJo Designs
12. LuLu at Knits and Reads
13. Stacie at The Creative Crate
14. Kim at 733
15. Amy at Priddy Creations

And, if you're still reading. (Ha! This is getting long!) Seven Things about Myself:
1. I don't drink coffee. (Just don't like it!)
2. My Mom and Aunt Sue are my biggest inspirations.
3. We (mom, Aunt, cousin, with the help of other key people) made almost everything for my wedding. We did all the invites, cakes, table toppers, programs, flowers, and favors ourselves. It was hard work, but also really fun. In fact, check back soon for Wedding Week, when I feature something we did each day. :o)
4. I am addicted to popcorn. It really is my favorite snack!
5. I will be traveling somewhere warm in April. Not sure where yet, but stay tuned for details. Ideas on where I should go? Click here and let me have 'em!
6. My dog makes me laugh on a daily basis. I love her!
7. My birthday is on March 15! It's coming soon!

Sunday, February 21, 2010

good luck.

I didn't realize that it is less than a month until St. Patrick's Day! St. Patrick's Day is very special to me because my husband proposed to me on that day three years ago. In honor of the holiday, (and because I saw the craft store had green burlap), I made a framed decoration.

I found a very inexpensive picture frame on clearance at Walmart. The green burlap is from Hobby Lobby (also very inexpensive ($2.99/yard). (In this picture I had already cut it to match the size of the picture frame insert.)


I then stenciled the phrase "good luck" onto the green burlap with white paint. I debated other words like "shamrock" "lucky" and "4 leaf clover".


I cut out a shamrock from scrapbook paper. I put it to the right and slightly above the word "luck." Then put everything into the frame.


Lucky for me, this didn't take long to make at all, and it was fun!


Wednesday, February 17, 2010

Coming to a City Near You?

Spring time is quickly approaching, and do you know what that means?? Two words. Spring. Break! I am not going to sit here and brag tell you that I am going somewhere warm and tropical, but really, I need WANT to go somewhere warm and tropical. Actually, I just want to go SOMEWHERE.

That's where you come in to rescue me wonderful blogging world! Any suggestions on a trip for my mom and I to take? Here are the details:

  • We live in West Michigan.
  • We both work in schools, so we have the same Spring Break, which will be at the beginning of April.
  • We will not be traveling internationally.
  • We are looking for a fun, inspiring place that is not too expensive.
  • We prefer to drive, but we're open to flying.
  • We like to craft, shop and go to the beach. (Ahh the life!)


Does anybody have any suggestions? If we don't go somewhere, we will end up spending EVERY day at Michael's, JoAnn's or Hobby Lobby (where the clerks already know us by name). There is nothing wrong with this, but are there any craft-inspiring places that we aren't thinking of? And if not inspiring, then, warm, sunny places that we would like?? Please share your thoughts, ideas and information. My buoyant teacher attitude (that needs recharging) thanks you in advance.

Monday, February 15, 2010

Valentine's Day (late!)

Happy Valentine's Day (a day late)!! I did not post yesterday because my husband and I went on a secret getaway to a Bed and Breakfast called The Shack.

We started out the day with heart-shaped cinnamon rolls.

We decided this year that we would exchange homemade valentines instead of buying things. I think they turned out extra special and sweet. Brian took pictures of our little doggie, Tulah in the shape of the word "LOVE." I must have laughed for about 5 minutes and then cried at the sweet sentiment. It was a perfect gift for me. I absolutely LOVE it beyond words.


We are still waiting for the frames to come, but I think it will look great on the picture ledge above our bed.


I made my hubby an altered deck of cards: 52 Reasons Why I Love You. I have seen these online before, so I decided to give it a go and make up my reasons (mostly inside jokes and such) on a deck of cards I got at the Dollar Store.


So, Happy Valentine's Day from us to you! XO

Sunday, February 14, 2010

Pedestal Birdhouse

As you recall, I had a few tricks up my sleeve for the ole’ hubby’s birthday weekend. This whole week, I had been giving him scattered clues, leading up to today- our big trip up north to a quaint bed and breakfast called The Shack. I wanted to think of a cute way of telling him we were going, so I decided to make something that looked kind of like a Shack… It ended up being a pedestal birdhouse. I got all of the supplies from Michael’s. I found a birdhouse that resembled a shack, a wooden candlestick and a square wooden base.

I painted it all and then Ralph-ied it up (laymen's terms: I glazed it). I used Gorrilla Glue Epoxy to put it all together.

I rolled another clue up and stuck it in the “door,” and off we are to The Shack!

Happy Valentine’s Day!! XOXO

PS: I am thinking I might make a few more of these (they offered different shaped “houses”) and play with the colors a bit to use some robin’s egg blue or spring time colors. Just a thought!


Made It Monday at the Persimmon Perch
Make Your Monday at Twice Remembered
It's So Very Cheri
Making the World Cuter Mondays at Making the World Cuter
Sumo's Sweet Stuff


Friday, February 12, 2010

Birthday Party Highlights

My hubby's birthday party was so much fun! We did a BBQ theme and everything was red and white. Since Michigan is under snow, but we love to grill out, we thought this was the next best thing. Here are a few highlights...

The centerpieces I made:


The Burger fixin' smile my hubby made.


Food table, with the napkin holder I painted.


The kid's table... yum- treat bags!


I realized about 20 minutes before the party started that I had nothing red to wear. (I know, weirdo, but I like to match my parties)...


...so I dug into my shoe collection and came up with these matching beauties- score!!


Happy Birthday Brian!

Blog Hop!

So, I am going to try something new today. I saw this over at Lanie's blog Lanie J. and Co. It is called Follow me Fridays, where bloggers can get a chance to meet other bloggers. They enter their link to their blog and then repost everyone's links and then hop away and check out everybody's blogs! Sounds like a fun activity to do with my day off! Here I go...


MckLinky Blog Hop

Wednesday, February 10, 2010

Birthday Banner

Happy birthday to the World's Greatest Husband!! I have ALL kinds of secrets up my crafty sleeve for the long-weekend. I can't wait! One thing he IS aware of is a little fiesta I have whipped up for him on Friday. Here is a glimpse of the birthday banner that I made on Saturday night while watching My Sister's Keeper. I think I managed to keep the tears off of it (why does it have to be SO sad??), it turned out pretty cute.


Related Posts with Thumbnails