My Aunt is an amazing crafter. I have many fond memories of watching her and my mom make things together, and once I was old enough, they always let me join in too. Yes, there were many hours of friendly plastic jewelry making, dollhouse painting, and rubber stamping. Ahh the memories!
So, I was not surprised when our Christmas card arrived on Friday from her. It is BEAUTIFUL! She took a vintage post card (mine is dated from 1912), embellished it with vintage buttons, ribbon and other trinkets, then glittered it all over. The tag on the front says, "Wishing you an old fashioned Merry Christmas". Perfect.
Sunday, November 29, 2009
Thursday, November 26, 2009
Happy Thanksgiving!
Monday, November 23, 2009
Blog Button
Sunday, November 22, 2009
Glittering Holiday House in a Jar
It is officially that time of year! The hubby says it is too early to put up the Christmas lights and decorations but I say if we don't put them up now, we won't get to enjoy them. So, I have decided to take baby steps. Here is my glittering holiday house-in-a-jar that I just made this weekend.
I have my Aunt and Mom to thank for this idea. They are always crafting up new ideas based on things they like and things they see. Most of the supplies came from Hobby Lobby, but I believe most craft stores carry all of this, especially at this time of year. Here are some pictures of some of the supplies I used:
If you would like to see how I made this, please continue to read (this might get a little lengthy, so please, pour yourself a cup of hot chocolate, get comfy and read on). If you would like to admire my glitzy house in a jar one more time, scroll back up and look at the first picture (oohs and ahhs are optional, yet appreciated).
The first thing I had to do was decide on a color for my house. I originally painted it a bright aqua blue, but I thought it was too intense. It would be reminiscent of the holidays in the Caribbean - nothing wrong with that, except that the snow I later put into the jar would not exactly happen in 90 degree weather, so I repainted and used a lighter color of blue.
My original color:
After painting, it is a good idea to bleach the trees that will be going in around your glittery house. The sooner you do this step, the more time they will have to dry. You may decide to skip this step all together if you would like to keep your trees the green color.
If you decide to bleach your trees, here are a few tips: make sure you wear old clothes and gloves (you don't want your clothes to become polka-dotted with bleach); try to do it outside if possible because, let's face it- bleach stinks!; and use 1/3 bleach, 2/3 water.
Dip each tree into the bleach solution, then set it aside to start to fade the color. When it is the desired color, dip it into cold water. You can always re-dip if you want the tree to look even lighter. Also, if the bleach solution is taking too long, add a bit more bleach to the water.
Dipping the tree into the bleach solution:
Waiting a few minutes for the bleach to lighten the trees before dipping them in cold water:
Dipping the bleached trees into the water, when they are the desired color:
While you are waiting for the trees to dry, cut a piece of white quilt batting and silver tinsel garland. These will go in the bottom of the jar. I used my jar and traced the bottom to get the correct size circle. At this time, it is also very important to make sure the inside of your jar is clean, it will be a lot harder to clean later, so do it now!
Now you are ready to begin gluing your batting to the bottom of the jar. The tinsel garland will go around the edge of the white to cover any unevenness.
Now it is time to check on your trees again! Are they dry? If not, blow dry them on low and get them to dry faster! You want to glitter them, don't you??
The glitter station: I used three different types of glitter. You can use as many or as little as you would like. I must say, my personal favorite glitter is the Martha Stewart Crystal Coarse Glitter that you can get at Michael's. I used some old shoe boxes to glitter over so that I could save as much as possible and pour back in to use for future projects.
I started with my house and I painted the Mod Podge all over. I then poured glitter over it. Use more Mod Podge if you need to (and more glitter of course!).
Repeat this process with your mini wreath (if you want one on your house) and your trees.
I also used some decorative snow to put on the roof of my house, the wreath and the fence. I applied it in an uneven way with a frosting spatula. While that was still wet, I put a coat of glitter on it.
Ok, now the hard work begins. (I know, what was all that before?) It is time to place the bottom of the house. Hot glue it to the bottom where the batting is. Then you can begin to place your trees and hot glue them in along with the fence and anything else you want to put in there (the jar is only so big).
Now hot glue your wreath to the top of your house (outside of the jar).
This picture was taken seconds before reaching around to the back of the wreath and burning my finger on the hot glue. (But hey, what's a day of crafting without burning off a fingerprint here and there.)
At this time if you would like to add any more glitter to the bottom of your jar to even things out, do so with a spoon or something that will fit into the jar.
Now you are ready to put the top of the house in the jar and put the lid on. Clean the fingerprints off the outside and any glue strings. Now you have a beautiful glittery house in a jar. Of course your own house probably looks like the glitter fairy had a New Year's Eve party, but it's well worth it.
Here is a picture of my mom's house. It turned out beautiful!
I am linking this to:
I have my Aunt and Mom to thank for this idea. They are always crafting up new ideas based on things they like and things they see. Most of the supplies came from Hobby Lobby, but I believe most craft stores carry all of this, especially at this time of year. Here are some pictures of some of the supplies I used:
If you would like to see how I made this, please continue to read (this might get a little lengthy, so please, pour yourself a cup of hot chocolate, get comfy and read on). If you would like to admire my glitzy house in a jar one more time, scroll back up and look at the first picture (oohs and ahhs are optional, yet appreciated).
The first thing I had to do was decide on a color for my house. I originally painted it a bright aqua blue, but I thought it was too intense. It would be reminiscent of the holidays in the Caribbean - nothing wrong with that, except that the snow I later put into the jar would not exactly happen in 90 degree weather, so I repainted and used a lighter color of blue.
My original color:
After painting, it is a good idea to bleach the trees that will be going in around your glittery house. The sooner you do this step, the more time they will have to dry. You may decide to skip this step all together if you would like to keep your trees the green color.
If you decide to bleach your trees, here are a few tips: make sure you wear old clothes and gloves (you don't want your clothes to become polka-dotted with bleach); try to do it outside if possible because, let's face it- bleach stinks!; and use 1/3 bleach, 2/3 water.
Dip each tree into the bleach solution, then set it aside to start to fade the color. When it is the desired color, dip it into cold water. You can always re-dip if you want the tree to look even lighter. Also, if the bleach solution is taking too long, add a bit more bleach to the water.
Dipping the tree into the bleach solution:
Waiting a few minutes for the bleach to lighten the trees before dipping them in cold water:
Dipping the bleached trees into the water, when they are the desired color:
While you are waiting for the trees to dry, cut a piece of white quilt batting and silver tinsel garland. These will go in the bottom of the jar. I used my jar and traced the bottom to get the correct size circle. At this time, it is also very important to make sure the inside of your jar is clean, it will be a lot harder to clean later, so do it now!
Now you are ready to begin gluing your batting to the bottom of the jar. The tinsel garland will go around the edge of the white to cover any unevenness.
Now it is time to check on your trees again! Are they dry? If not, blow dry them on low and get them to dry faster! You want to glitter them, don't you??
The glitter station: I used three different types of glitter. You can use as many or as little as you would like. I must say, my personal favorite glitter is the Martha Stewart Crystal Coarse Glitter that you can get at Michael's. I used some old shoe boxes to glitter over so that I could save as much as possible and pour back in to use for future projects.
I started with my house and I painted the Mod Podge all over. I then poured glitter over it. Use more Mod Podge if you need to (and more glitter of course!).
Repeat this process with your mini wreath (if you want one on your house) and your trees.
I also used some decorative snow to put on the roof of my house, the wreath and the fence. I applied it in an uneven way with a frosting spatula. While that was still wet, I put a coat of glitter on it.
Ok, now the hard work begins. (I know, what was all that before?) It is time to place the bottom of the house. Hot glue it to the bottom where the batting is. Then you can begin to place your trees and hot glue them in along with the fence and anything else you want to put in there (the jar is only so big).
Now hot glue your wreath to the top of your house (outside of the jar).
This picture was taken seconds before reaching around to the back of the wreath and burning my finger on the hot glue. (But hey, what's a day of crafting without burning off a fingerprint here and there.)
At this time if you would like to add any more glitter to the bottom of your jar to even things out, do so with a spoon or something that will fit into the jar.
Now you are ready to put the top of the house in the jar and put the lid on. Clean the fingerprints off the outside and any glue strings. Now you have a beautiful glittery house in a jar. Of course your own house probably looks like the glitter fairy had a New Year's Eve party, but it's well worth it.
Here is a picture of my mom's house. It turned out beautiful!
I am linking this to:
Thursday, November 19, 2009
Post It Note Holder
Looking for an inexpensive, easy-to-make teacher or co-worker gift? Look no further! I made very simple post it note holders out of clear, acrylic picture frames. I got mine at Walmart for $0.80 each. They are the 3.5 inch by 5 inch size. I also used scrapbook paper (one 12"x12" piece), some ribbon, and alphabet stickers (all of which I was using up from my home stash, so seriously, all I spent was $0.80 (picture frame) + $0.70 (post it pad) for a total of $1.50). I found a packet of 10 sticky note pads at Target in cute colors.
I started out by measuring and cutting the scrapbook paper to the 3.5" x 5" size.
I then put the scrapbook paper in the frame upside down (because the frame is going to lay down, not stand upright, so as to be able to hold the post it notes).
After that, I used the alphabet stickers to put the teacher's name on the holder. You could use alphabet stickers or, you could just choose to put an embellishment of some sort.
I also tied a ribbon around the base of the frame. The bow of the ribbon will hit right above the stickers (see pic of finished product).
The last step is to take a post it pad, peel off the backing and use the last sticky note to stick it to the frame. You could also get a cute golf-sized pencil to lay across the top of the pad.
And there you have it! An adorable post it note holder, inexpensive to both your wallet and your precious time!
Sunday, November 15, 2009
Holiday Ornament Tree
The holidays are coming fast, which does not leave us a lot of time to decorate! I love to decorate my house for ALL holidays, but there is something so special and magical about the Christmas Season. Last year, my mom and I decided to make Christmas Trees with Ornaments. My ornament tree is so special to me (and delicate), that it has its very own shelf in the basement so that nothing happens to it. Every year I can't wait to pull it out!
We started with one of those styrofoam cones that you can get at any craft store. You can choose the size to fit your needs. We also picked out a cute base that would fit the cone. Mine was a candle holder that I got half price at Hobby Lobby. I have also seen them at Ikea. (Love that place!)
We used TONS of hot glue for this project. We started out by hot gluing the styrofoam cone to the candle holder. Then it was time to work from the bottom to the top and put on TONS of glass ornaments. Unfortunately, we did not take pictures along the way, but you can imagine it. As we glued the ornaments on we would gently push the top of them into the styrofoam, to secure them a little better. My mom has a hot glue skillet that made things a whole lot easier, so that we could dip the ornaments instead of having to hold the glue gun each time. We used tiny ornaments to fill in any gaps along the way.
The end product is gorgeous and you can obviously choose your colors to match your decor. It was a time consuming craft, but there is nothing better I would have wished I was doing than spending time with my mom. Throw on some good holiday jingles and bake some cookies and craft away!
Saturday, November 14, 2009
ID Tag Blues
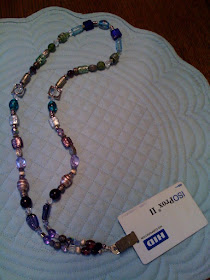
Like most people I know, I have to wear an ID badge at work everyday. I get highly frustrated because I wear my ID badge on a lanyard around my neck, however, it is just the right length (or I am just the right amount short) where it is constantly getting caught on things and choking me. Not a good feeling. So, when my fellow RedHeaded mother turned to me one day and asked, "Want to bead something?" the idea occurred to me, that I needed to bead my own lanyard.
Now, my mother is a Master-Beader. She is SO organized and has imparted the wisdom to always put your beads back in the correct container. Some day I will post pictures on how she organizes her collection, but for now, I will just post a picture of the finished lanyard. It turned out great and did not take me long at all. I am glad people will be able to tell who I am in true beaded style.
Sunday, November 8, 2009
Monogrammed Picture
This might be my favorite craft yet. I am thinking it will become a Christmas gift for some lucky, special people. If you see it on my blog first, please pretend to be surprised if you unwrap it this season. I think this would also make a super cute hostess gift for all those holiday parties coming up.
It was so easy to make (and very inexpensive)! I enlisted the help of my hubby because he has Photoshop on his computer, so he made me the magazine article that started with the big "L" (I used lyrics to a song). You could also do some searching and find a magazine article that starts with the initial you need. I then blew it up on the copy machine. I found the frame at Goodwill and had to clean it and spray paint it black. I placed the "initial article" in the frame with a photo mat, and voila- an adorable personalized, monogrammed picture! I love mine!!
If you would like to see how other people did this same craft, click here.
Friday, November 6, 2009
Holiday Arts & Crafts show
Mark your calendars! If you live in Michigan or anywhere near the Muskegon area, you won't want to miss this opportunity. This Saturday is the Mona Shores Holiday Arts & Crafts show! With over 160 booths, it's the Lakeshore's biggest show of the season! Because my fellow red-headed mom organizes it, I get to live the ultimate crafter's life and work the show. I love it! Please go to their website for more information about this wonderful event.
Holiday Arts & Crafts Show
Celebrating 30 years!
Saturday, November 7th
9:00 a.m. - 3:00 p.m.
Mona Shores High School
Thursday, November 5, 2009
Family Circle Magazine - 2 Free Issues
When I have a few minutes of free time, but not enough time to dive into a novel, I love to pick up a magazine and browse some of the articles. Now you can get 2 free issues of Family Circle Magazine! Click here to get yours today! I just signed up and can't wait to get mine.
If you like to save money the same way I do, here's a trick: I found out about this offer from this cool blog.
Wednesday, November 4, 2009
Don't Agonize, Organize!
We've heard it before: “Don't agonize, organize”. Yet here I am agonizing. Could it be the agony in my lower back, after spending hours sitting on the floor in my living room? Yes. I recently received a BUNCH of crafting items from my Aunt and Grandma. Look at all the goodies I scored!
How do I organize it all?? It's official- I am going to need to create a crafting space in my house. Call the hubby- he has some dry-walling to do! I would love a place like this. I don't think that will happen anytime soon. I will just have to improvise.
I may not have a "crafting space," but I certainly do have all the supplies to fill the place including these adorable cans from the original crafter of my family, my darling Grandma! These will definitely have a special place front and center in my (future) crafting station.
I had to chuckle because if you look closely in the picture above, you will see the cute duck-shaped pencil holder, hand-crafted by my wonderful Grandpa. It comes complete with scribbles on the sides, crafted by one of the grandchildren many moons ago (maybe it was me?). I can't wait for that little guy to sit next to grandma's cans. The thought of it "quacks" me up. (Get it? hehehe)
All this organizing led me to a grateful moment. I am lucky to come from such a "crafty" family. My grandmother, the artist; my grandfather, the woodworker; my mother, the fellow red headed crafter (she used to own her own crafty store); and my father, the fixer-upper of anything. (Just to name a few.) Where would I be without these people to inspire me?
What inspires you? Leave a comment and let me know!
Sunday, November 1, 2009
Halloween Hot Dog
What a terrific Halloween night! Inspector Gadget and Cleopatra had a wonderful time with their little hot dog, Tulah.
Normally, Tulah would be all about the hot dogs, but apparently, wearing one is not as fun as eating one. This was not her favorite costume, but all of the little ghosts and goblins sure did enjoy seeing her at the door.