It is officially that time of year! The hubby says it is too early to put up the Christmas lights and decorations but I say if we don't put them up now, we won't get to enjoy them. So, I have decided to take baby steps. Here is my glittering holiday house-in-a-jar that I just made this weekend.

I have my Aunt and Mom to thank for this idea. They are always crafting up new ideas based on things they like and things they see. Most of the supplies came from Hobby Lobby, but I believe most craft stores carry all of this, especially at this time of year. Here are some pictures of some of the supplies I used:


If you would like to see how I made this, please continue to read (this might get a little lengthy, so please, pour yourself a cup of hot chocolate, get comfy and read on). If you would like to admire my glitzy house in a jar one more time, scroll back up and look at the first picture (oohs and ahhs are optional, yet appreciated).
The first thing I had to do was decide on a color for my house. I originally painted it a bright aqua blue, but I thought it was too intense. It would be reminiscent of the holidays in the Caribbean - nothing wrong with that, except that the snow I later put into the jar would not exactly happen in 90 degree weather, so I repainted and used a lighter color of blue.
My original color:

After painting, it is a good idea to bleach the trees that will be going in around your glittery house. The sooner you do this step, the more time they will have to dry. You may decide to skip this step all together if you would like to keep your trees the green color.
If you decide to bleach your trees, here are a few tips: make sure you wear old clothes and gloves (you don't want your clothes to become polka-dotted with bleach); try to do it outside if possible because, let's face it- bleach stinks!; and use 1/3 bleach, 2/3 water.
Dip each tree into the bleach solution, then set it aside to start to fade the color. When it is the desired color, dip it into cold water. You can always re-dip if you want the tree to look even lighter. Also, if the bleach solution is taking too long, add a bit more bleach to the water.
Dipping the tree into the bleach solution:

Waiting a few minutes for the bleach to lighten the trees before dipping them in cold water:

Dipping the bleached trees into the water, when they are the desired color:

While you are waiting for the trees to dry, cut a piece of white quilt batting and silver tinsel garland. These will go in the bottom of the jar. I used my jar and traced the bottom to get the correct size circle. At this time, it is also very important to make sure the inside of your jar is clean, it will be a lot harder to clean later, so do it now!
Now you are ready to begin gluing your batting to the bottom of the jar. The tinsel garland will go around the edge of the white to cover any unevenness.


Now it is time to check on your trees again! Are they dry? If not, blow dry them on low and get them to dry faster! You want to glitter them, don't you??
The glitter station: I used three different types of glitter. You can use as many or as little as you would like. I must say, my personal favorite glitter is the
Martha Stewart Crystal Coarse Glitter that you can get at Michael's. I used some old shoe boxes to glitter over so that I could save as much as possible and pour back in to use for future projects.
I started with my house and I painted the Mod Podge all over. I then poured glitter over it. Use more Mod Podge if you need to (and more glitter of course!).


Repeat this process with your mini wreath (if you want one on your house) and your trees.


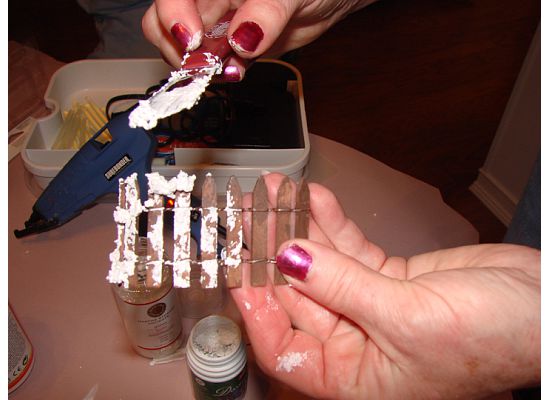
I also used some decorative snow to put on the roof of my house, the wreath and the fence. I applied it in an uneven way with a frosting spatula. While that was still wet, I put a coat of glitter on it.


Ok, now the hard work begins. (I know, what was all that before?) It is time to place the bottom of the house. Hot glue it to the bottom where the batting is. Then you can begin to place your trees and hot glue them in along with the fence and anything else you want to put in there (the jar is only so big).
Now hot glue your wreath to the top of your house (outside of the jar).
This picture was taken seconds before reaching around to the back of the wreath and burning my finger on the hot glue. (But hey, what's a day of crafting without burning off a fingerprint here and there.)

At this time if you would like to add any more glitter to the bottom of your jar to even things out, do so with a spoon or something that will fit into the jar.
Now you are ready to put the top of the house in the jar and put the lid on. Clean the fingerprints off the outside and any glue strings. Now you have a beautiful glittery house in a jar. Of course your own house probably looks like the glitter fairy had a New Year's Eve party, but it's well worth it.


Here is a picture of my mom's house. It turned out beautiful!

I am linking this to: