Home  |  As Featured On  |  Advertising  |  Parties I Like!  |  Contact Me  |  About  |  Shop


Sunday, March 27, 2011

Coffee Pot Coaster

Remember how we just finished painting our countertops? Well, now we are obsessed with protecting them. Whenever the Hubby makes coffee, he tries to pull out the coffee maker and it scrapes across the countertop. I decided to remedy that problem. I made a coffee pot coaster. It takes like maybe 10 minutes and just a scrap of fabric.

I started by making a pattern out of paper under my coffee pot. I eyeballed it to the size I wanted. No rocket science here.

Fold your scrap fabric in half and use your paper pattern to check for the size.

Cut it out.

I also cut a piece of batting to put in the coaster for extra protection.

Sew the two pieces of fabric right sides together with the batting using a 1/4" to 1/2" seam allowance. Leave one side partially open so you can turn it right side out.

Trim the corners and then turn right side out and pin opening.

Top stitch all the way around the entire square, closing the space you just pinned.

And there you have it! A cute, practical decoration for your kitchen!


PS: Did you notice I used the leftover fabric from this project?

I will link to these parties this week!

Friday, March 25, 2011

I Spray Paint in Rhythm!

Hi there! Happy Friday! This is hilarious and I can't believe I am about to type this, but I just had a realization! I totally spray paint to a rhythm!! Yup, that's right! Call me Crazy, but it might be due to the fact that we just got back from a mini trip to Nashville where the weather was like in the 70's and then here in Michigan we had a SNOW DAY this week. But today, when I saw the sun I told myself it was time to spray paint some items.


So I dragged everything outside and began to spray when all of the sudden...

"Jolly Old Saint Nicholas, lean your ear this waaaaaaay"

(Picture a smooth, even coated spray with every word.)

What??? First off, WHY am I spray painting to the beat? And Secondly, WHY does the beat have to be a CHRISTMAS song?? Are you kidding? Have I completely lost it? Please tell me you do something equally as weird. Do you spray paint to a rhythm?? In the very least, please laugh very hard at this post and then pretend like it never happened. Hehehehehe!

Have a great weekend!

Sunday, March 20, 2011

$20 Kitchen Update

I mentioned that we were doing a few things to our kitchen recently. Did I fail to mention that we were doing these things for, oh, let's say, zero money? Ok, trying to update it for zero money, but willing to use a *little* teesy bit.

I don't have a "before" picture of my kitchen, but this one at least shows the original color of the laminate counter tops. The laminate also went up the walls to form a, ahem, nice backsplash.

When I got home from work one day, this is what my kitchen looked like.

Then there was a few hours days of scrubbing and trying anything to get the old glue off of the wall.

Then came the laminate counter paint. Yup, you heard me. They make paint specifically for covering old laminate. We used the light ash color.


Here is the countertop after one coat. (Check out the nicely patched and primed backsplash too.)
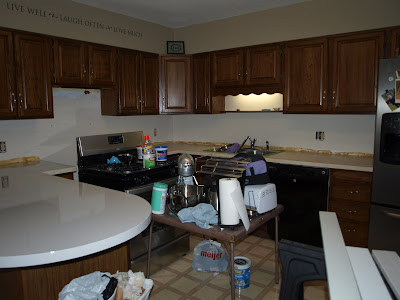

And here it is after two coats.
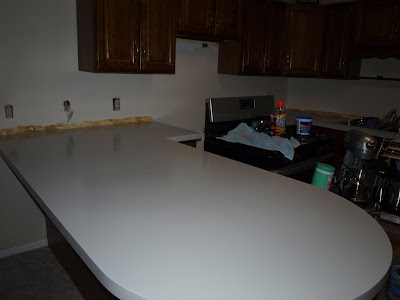
On a side note, painting the laminate was the cheapest way to update the counter without spending lots of money. We spent about $20 at Home Depot on the paint. We used supplies that we already had and the rest was pure sweat equity.

The laminate paint was VERY STINKY! We tried to paint it at about 3pm one day with windows and doors open and then sleep in the house that night. We started off fine, but at 2am I woke up and HAD to open the window in the bedroom. Yeah, it was the middle of February and freezing cold, but it was better than the burning eyes and throat feeling.

Here is the after pic. The paint had to cure for about 2-3 days, which meant we could not put anything on the counter for that long.

Here is another "staged" picture, but the color looks a little funny because of the flash. Now if you would just ignore my beautiful pink and cream floor...


Overall, we are really happy we did this, but in my opinion, it is not a permanent solution. In some spots, the paint dried with a funny texture, and I am not sure how we could have prevented that. I figure aesthetically, it is great, and if ever we sell the house, we have left it with a "blank slate" so to speak and ready for upgrades.

PS: See that blank, odd shaped spot in the wall to the left? Check out what I made to put there.

I'll be linking to these parties this week.

Sunday, March 13, 2011

Calendar/Menu/Memo Board

We have been working on our kitchen lately. We are just trying to update it a bit. Part of this update was to take off the old laminate backsplash and refinish the walls behind it. We have this one area of wall that we were not sure what we should do with it.

Enter this frame:

Yes, it's from our wedding. Yes, our wedding happened almost 3 years ago. Yes, it's still in it's original packaging (For protection, ok? Don't judge!).

Here's the thing. I love this frame. I love that people signed it and gave us well wishes on our wedding day. I just had not gotten around to hanging it up. It has been on display at our house propped up nicely behind our couch for all to admire and see when they came over.

Until now.

Why? Because it is the perfect size for the awkward place in our kitchen! Snap!

So I took the frame and this really cute fabric I found in the remnants section at JoAnn's.

I used the fabric to wrap the photo mat inside the frame. I secured it with tape. Then I used my Cricut (Designer's Calendar Cartridge) to cut out a calendar frame.

After that, I cut out the words "Notes" and "Menu" (using Doodletype Cartridge) and put them onto coordinating scrapbook papers.

I positioned it all into the frame and used double sided tape to sick it to the fabric backing. Reassemble the frame and use a dry-erase marker to write on it and you are all set!


Now, if only this calendar/memo/menu board could make ME be more organized... if I build it, it will come, right?

Stay tuned for after pics of where I put it in the finished kitchen. I am just working on a little shelf to go under it and then I will show you.

I will be linking to these parties this week. Woohoo!

Sunday, March 6, 2011

St. Patty's Day Burlap Sign Re-post

I have been a little lazy lately. Actually, just really busy (more to come on that later). I decided to repost an old St. Patty's Day craft that I made last year when there weren't as many cool, awesome, rad people like you reading and following my blog. If you are one of the cool, awesome, rad people who did happen to read this post last year when I first wrote it, then thanks and ignore!

I found a very inexpensive picture frame on clearance at Walmart. The green burlap is from Hobby Lobby (also very inexpensive ($2.99/yard). (In this picture I had already cut it to match the size of the picture frame insert.)


I then stenciled the phrase "good luck" onto the green burlap with white paint. I debated other words like "shamrock" "lucky" and "4 leaf clover".


I cut out a shamrock from scrapbook paper. I put it to the right and slightly above the word "luck." Then put everything into the frame.


Lucky for me, this didn't take long to make at all, and it was fun!


I will be posting to these parties this week.

Related Posts with Thumbnails