Home  |  As Featured On  |  Advertising  |  Parties I Like!  |  Contact Me  |  About  |  Shop


Sunday, August 29, 2010

Sparrow Canvas

I have seen lots of lovely canvas art projects in craft-bloglandville. I have always wanted to try one, so I went to Mike's with a coupon and bought me a canvas.

I painted it gray with acrylic paint.

Then I used my Cricut to cut out letters. I used the "Doodle Type" font cartridge. I arranged the words and lightly glued them down so that they wouldn't move when I mod podged it. (If you don't have a Cricut, you can print your saying on a computer and cut it out.)

I then put a light layer of Mod Podge all over the canvas.

When it was dry, I ended up with an adorable canvas!

*The saying is from a Gospel hymn, which, depending on how you interpret it, totally fits with what we talked about at church today (I love it when things like that happen). Not only does God have His eye on the lesser things like the sparrow, but maybe we should also watch out for the people who are often times overlooked.


Have a great day! PS: I will be linking up to these parties.


Get Your Craft On @ Today Creative Blog

Sunday, August 22, 2010

Picture Frame Memo Board

The Menu Board was working so well at my house, I decided I needed one to write notes and reminders on.

So, I found me a cute picture frame (8"x10"). (Paint it if you need to.) And also a cute piece of scrapbook paper.
See that red tag on the picture frame? Red Tag = clearance; clearance = cheap; cheap = Courtney's happiness. Woohoo!

Anyway, I usually use the paper that comes with the frame to trace onto my scrapbook paper so I know what size to make it. Then cut out the paper.

Clean the picture frame glass and put the paper into the frame. Write a little note with dry-erase marker, and you are good to go.

This one I used at the baby shower, thus the note, but we also use it at home. That's the great thing about these- they are reusable. Mother Nature is smiling!

Here is one that I made for my cousin and her husband for their anniversary.


I also like to put a little sticky velcro onto the dry-erase pen and the back of the frame, then the pen is easy to locate when you need to make a quick note. I might need to make one of these for my classroom now too. :o)

I will be linking to these parties this week.

Sunday, August 15, 2010

Dry Erase Menu Board

I am sure you have seen tons of these floating around Blogland, but I had to join in and -Wow- can I just say that this is working for me and my husband!

We have a hard time coming up with dinners to make at home. We are always SO tempted to go out to eat or order in, that I finally decided to come up with a menu board.

I used an old picture frame from Goodwill that I painted black. I popped in some cute scrapbook papers and I cut out the words "Buen Provecho" (Spanish for "Good Appetite/ bon appetit") as well as the Monday-Sunday letters. I put those onto the scrapbook paper, put it all back into the frame and voila- an adorable menu board that you can use a dry erase marker on!


I will be linking up to these parties this week. Enjoy!

Wednesday, August 11, 2010

Sweet Treat Baby Shower

This past weekend, my friends and I threw a baby shower for our friend Anne. Our theme was Sweet Treats and we served all desserts! Yum!

Here are a few highlights from the shower.

The Sweetest Thing banner

The Wish Tree table

The mantel decorated with antique wood blocks and candy.

Some cute paper cupcakes hanging from the lights

Candy in the vases

The Cupcake Stand made out of planters

The yummy desserts

The favors and prizes

The lollipop soaps - see how to make them here


It was such a great time! Babies truly are the *sweetest thing*!!!

Sunday, August 8, 2010

Lollipop Soap

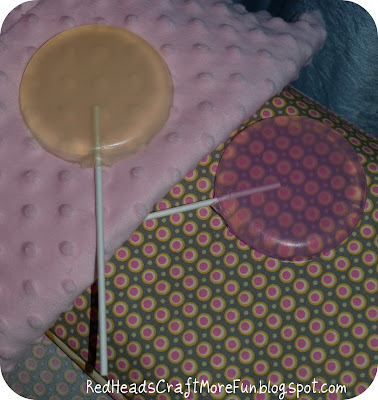
This past weekend, I had a baby shower for one of my really good friends. The theme was *Sweet Treats*. It was a dessert shower and despite the fact that I gained some good old l-b-s's (aka: pounds), the party favor did NOT make me gain any. Check these out!


Don't they look good enough to eat wash your hands with?? They were so easy to make.

Here is a picture of what you will need:
Clear glycerin soap from Hobby Lobby, scent oil, coloring, a cookie pan and lollipop sticks. You will also want a spritzer bottle with rubbing alcohol in it.

Start out by putting the soap into a microwave safe container, I microwaved it for 1 minute the first time at half power, then 30 seconds at half power until melted. You do not want it to boil.

This is what it looks like all melted. If you see little bubbles, spritz in some rubbing alcohol and the bubbles magically disappear!

Add in your coloring. A little goes a long way and you can always add more. Stir it up really good and spritz more alcohol if you see bubbles.

Then add your scent. As much or as little as you want. Stir it up good and spritz more alcohol if you see bubbles. Slowly pour into your mold. If bubbles appear, what do you do? Spritz alcohol!


Let them cool and then pull them away from the mold. They weren't hard to remove, but if the stick wiggles too much, they aren't cool enough, give 'em more time.

Like I said, I used these as party favors, but they would make excellent house-warming gifts, holiday gifts, Mother's Day gifts, etc. Don't forgot to include a little note with them that reminds people not to eat the soap. Mine said something like, "Please enjoy, but do not lick- For eating soap can make you sick!"

I will be posting to these parties this week.

Sunday, August 1, 2010

Fabric Covered Notebooks

Summer is flying by! Have you noticed that back to school items are lining every aisle in the stores? I try hard not to notice because I need no reminder that I have to rejoin the working world come September, however, I have always loved those black composition notebooks. Black and white is great, but why not rejuvenate the mundane piece of school supply with a little splash of color? Read on my dear pupils.

It's as easy as A, B, C... 1, 2, 3... ok, you get the picture.

Here is what you will need: A composition notebook, a fat quarter or fabric scrap, and some Heat n Bond iron-on adhesive. You will also want an iron, fray check, and a rotary cutter or scissors. Oh, and you might want a band-aid (more on that later)...

Be sure to choose a fabric that is dark enough to cover the black on the notebook. Otherwise you can use white duct tape to cover it.

Cut your fabric so that it is a little bit bigger than the notebook. Your cutting does not need to be perfect.

Cut the Heat n Bond slightly smaller than the fabric. (The white in the picture is the Heat n Bond). It should be a bit bigger than the notebook, but smaller than the fabric.

Set the notebook aside and iron the Heat n Bond to the fabric. I used the "wool" setting on my iron. I moved it slowly over the paper.

Let the Heat n Bond cool for a minute and then peel it back. If it doesn't come up easily, iron over it some more, let it cool, and try again.

Place your book onto the Heat n Bonded fabric and close it. Iron over the cover to seal the Heat n Bond to the notebook. Then iron over the back and the spine. Notice how the fabric does not cleanly match up with the notebook, this is ok, you will cut it off later.

After you have formed a seal, open the book and cut around the edges of the fabric with a rotary cutter or scissors. Be careful not to cut the tip of your thumb with your rotary cutter, it will bleed. A lot. You will need a band-aid.

After you trim your edges, iron over the whole notebook carefully and slowly. If the edges look like they will fray, use fray check on them.


Pop one of these cuties into your child's backpack and back to school will go from cruel to rule!!

I will be linking up to these great parties.

Related Posts with Thumbnails