Home  |  As Featured On  |  Advertising  |  Parties I Like!  |  Contact Me  |  About  |  Shop


Showing posts with label paper. Show all posts

Wednesday, November 24, 2010

Fall Memo Boards

Remember my picture frame memo board project? Well, I decided to switch it up a bit for different occasions/seasons. Very. Simple. Thing. To. Do.

Cut new paper and place into said picture frame. Enjoy.

Here is my Thanksgiving themed memo board.

Here is a Fall themed one.

I ended up adding a tree cut-out to the busy background.

Stay tuned for my Christmas/Holiday themed one!


Sunday, September 12, 2010

Custom Made Envelopes

I love writing notes. I used to write notes all the time for my parents and leave them in fun places and now I do it for my husband. I would even make little envelopes to put them in. The other day, I made a card for my friend's birthday (Happy birthday Anne!), but I realized I didn't have an envelope to send it in. That's when I thought I could make one.

1. I found a nice page out of a magazine and began to fold.

2. Fold one side of the paper over about an inch, then slip the card to that side.

3. Then fold the right side over the top (it will probably hang over).

4. Trim off the excess paper that was hanging over.

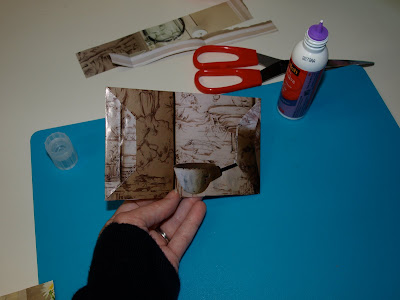
5. Unfold everything and fold up the bottom.

6. Trim the top of the envelope, but not all the way (this is going to be the flap of the envelope. If you are unsure, check out the next pic before cutting.

7. This is the rough template you are going for.

8. Put the card back into the "envelope."

9. Put some glue on the left side.

10. Press closed.

11. Fold up the bottom like you are wrapping a gift.

12. Use some glue to secure the bottom.

13. At this point make sure your card is really in the envelope. Then fold the top flap just like you did the bottom.

14. Here is a picture of what the back looks like.

15. Find another piece of paper or a label to put on the front and address it to the lucky recipient.


What a great way to recycle some old magazine pages and spread some cheer!

I will be linking up to these parties this week.

Oh, and Anne, if you are reading this, your card is a little late, but I hope you had a great birthday today!!

Sunday, August 22, 2010

Picture Frame Memo Board

The Menu Board was working so well at my house, I decided I needed one to write notes and reminders on.

So, I found me a cute picture frame (8"x10"). (Paint it if you need to.) And also a cute piece of scrapbook paper.
See that red tag on the picture frame? Red Tag = clearance; clearance = cheap; cheap = Courtney's happiness. Woohoo!

Anyway, I usually use the paper that comes with the frame to trace onto my scrapbook paper so I know what size to make it. Then cut out the paper.

Clean the picture frame glass and put the paper into the frame. Write a little note with dry-erase marker, and you are good to go.

This one I used at the baby shower, thus the note, but we also use it at home. That's the great thing about these- they are reusable. Mother Nature is smiling!

Here is one that I made for my cousin and her husband for their anniversary.


I also like to put a little sticky velcro onto the dry-erase pen and the back of the frame, then the pen is easy to locate when you need to make a quick note. I might need to make one of these for my classroom now too. :o)

I will be linking to these parties this week.

Saturday, December 26, 2009

Paper Ornaments

Sometimes I like to embellish my presents. This year I decided to put paper ornaments on the outside of my presents. I have seen these before and decided to give them a try.

I started out with six 4 inch circles of three different patterned paper. Could I type that any more confusing? That equals three 4 inch circles in one color, three in another and three more in another color or pattern. (For a grand total of 6!) I also found that a bone to help fold the paper worked well too.


Fold each paper circle in half.


Glue half of the back of one paper circle to another back's half. As you get down to the last circle, you will need to put the ribbon in. I like to tie a loop onto the top.


Then glue the last circle on.


After it dries for a bit, I tie a bead to the bottom where the ribbon dangles. Here is how my first attempt turned out.


Notice anything? Yeah, I put the ribbon loop on the wrong end- it is hanging upside-down. Perfect for Christmas in Dr. Seuss' Whoville!! If I had noticed it earlier, while the glue was still wet, I could have switched it.

Here are some other attempts.


And, sometimes the ends of the circles don't match up perfectly. You might want to trim them or just distress them a bit with distress ink to cover the white.


Friday, October 23, 2009

Paper Arrived Via the Post

Pleasant surprise when I got home from work today! My personalized notecards from Traylor Papers were waiting to greet me at the door! I LOVE paper (maybe that's why I'm a teacher??)!!! I can't wait to send some notes via snail mail.

Tulah wonders what is in the envelope...


It's from our old friend, Traylor Paper


Three beautiful notecards!


Blue and brown...


Pink and green...


Blue, brown, and cream plaid!

Monday, October 19, 2009

Free Paper? Yes Please!

Why does paper make me so happy? It doesn't matter because it just DOES! So, when I found out I could get truly adorable paper for free (read it- FREE), I decided to jump on it. Now you can get free paper too!

Traylor Papers is offering free stationary and here's the deal:

"Send us an email to VIP@traylorpapers.com with your name and address and we'll send you a free customized card with your name. Tell us your favorite colors and/or style (i.e., whimsical, classic, girly ..., etc) and we will try to make you a match :) BONUS: post this offer on your blog or wall, send us a link, and we'll send you a few extra! Good thru 10/28/09!"
Related Posts with Thumbnails