Home  |  As Featured On  |  Advertising  |  Parties I Like!  |  Contact Me  |  About  |  Shop


Sunday, July 31, 2011

Recovering a Lamp Shade

Remember my childhood dresser redo? I mentioned that I've been redecorating our guest room and that is where the dresser is, but I also needed a lamp to provide some mood lighting to my guests. Today I want to share with you this cute lamp that I painted and recovered.

Don't get scared. If *I* can recover a lamp shade, so can you! I had absolutely no idea what I was doing, but I love how it turned out. I'm hoping I can shed some light (pun intended) on the subject for you.

This is what the lamp started out looking like.

I taped off the electrical components of the lamp and gave it a nice spray with light yellow paint.

I used the lamp shade to trace and make a pattern. I kind of rolled it as I traced. I didn't have a lot of fabric to work with, I was using a scrap that I found in the remnants bin at the store, that's why I decided to go with the making-the-pattern-approach.

This is what my pattern ended up looking like. Depending on your lamp shade, yours will look different. My pattern is for 2 sides of my lamp, so I knew I would have to cut out 2 pieces of fabric using this pattern.

I cut out my fabric with a little help from Choco. (She has a habit of always making herself comfortable on the exact area of fabric I need to work with. She is too cute to kick off.)

Use some spray adhesive to attach the fabric to the old lamp shade.

Remember how I was working with a small amount of fabric? Because I had 2 pieces of fabric, I had to seam up my edges, but it was easy, I just folded the ends under to finish them off and used the spray adhesive.

The top and bottom are going to have all kinds of crazy fly-away fabric. This is ok. I will show you how to finish it off.

Trim the excess fabric.

Now use bias tape and hot glue it around the edges to finish it off.

Smooth it down and make sure it stays put!

It was really pretty easy!


I have a few more finishing touches to put on the guest room and then I will let you see it! I am also still working on a spray booth tutorial. Good things come to those who wait...

I will link to these parties this week. How fun!

Sunday, July 24, 2011

Pegboard Update

I've had this pegboard around for as long as I can remember. My Mom and I painted it for one of my first apartments when I finished college. Now I have hanging up by our back door to hang coats and bags on. I just thought it could use a little update though. This is how she turned out... what a beauty!


I used my Silhouette to cut out the stencil for the numbers.

I measured and spaced out the stencils because I am crazy like that.

Begin stenciling.

Let it all dry.

Hang it back up!
It's a great home for my market bag!


I'm going to link to these parties this week.

Monday, July 18, 2011

Three Tiered Crystal Dish Makeover

I have been hitting up the estate sales lately. I'm finding all kinds of fun things! There was this awesome victorian house on the lake that I went to recently (Ok, I went to it and then went back 3 other times- it was that good).

That's where I found this beauty... She is a three-tiered crystal flower dish. I was totally eyeing her, but wasn't digging the gold posts and handle.

Nothing a little spray paint can't help.

Put it all together and voila!

Totally cute! I can't wait to have a party so I can use it right away!

Please join me at these parties this week.

Sunday, July 10, 2011

Childhood Dresser Redo

Man, I have been having a great summer so far! We just got back from an awesome trip to Nashville visiting some great friends. But it is now back to business and time to get some things done. This week I was busy refinishing my childhood dresser.

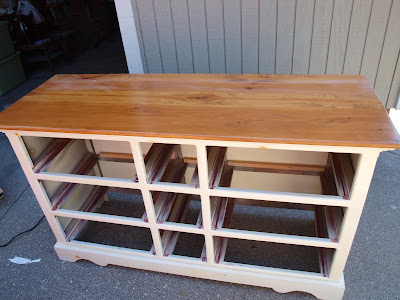
I don't have a good before picture, but if you look at this one, you can imagine what it looked like with the drawers. It used to have big wooden drawer pulls too.


Anyway, this dresser is now in our guest bedroom (which is undergoing an amazing makeover, by the way). I knew exactly what I wanted to do, but I needed my partner in crime to help me, so my Mom came over.

We sanded the top and then we were going to stain it a dark jacobean color, but it didn't look good. (It kind of turned out leopard print, which my inner sixteen year old secretly LOVED, but it wouldn't match the look of the room.)


So, we sanded it AGAIN. This time we painted it with black paint, but we painted it lightly so that some of the grain still showed through. I love that look.


I plan to repaint the white to go over some of the wood knots, but I didn't feel like getting the white paint out. Two words: Lazy Summer.

That's all I'm going to show you until I reveal the rest of the room! I have some other neat things planned to show you too, perhaps a lamp shade re-do and a spray booth tutorial! Woot woot!

I will link to these parties this week.
Related Posts with Thumbnails