Home  |  As Featured On  |  Advertising  |  Parties I Like!  |  Contact Me  |  About  |  Shop


Showing posts with label halloween. Show all posts

Tuesday, October 26, 2010

Chalkboard Halloween Decor

I bit the chalkboard bullet and decided to create a few things for Halloween using chalkboard spray paint.

The first I made was a chalkboard pumpkin. I got a black pumpkin at Michael's and simply spray painted it. Wrote "eek" on it and it is oh-so-cute!


And the other project, I am sure you have seen all over blogland as a PB knockoff. I took some rocks, spray painted them with the chalkboard paint, added some vampire faces and other assorted words, and yet another spooky creation!


I love Halloween!

Sunday, October 24, 2010

Halloween House

I found this awesome treasure at Goodwill for 4 bucks last month! I debated getting it, but my mom talked me into it. She knew I could transform it into something for Halloween. (Don't Moms know everything??)

I spray painted it black.

My dad helped me pry the back off.

Then my mom and I covered the back with paper.

We then reattached the back.

After that, I used my Cricut to cut out some Halloween shapes. I used foam adhesive dots to stick the shapes into the windows of the house.

Now I just need to find a place to hang it!


Happy Halloween! I will be posting to these parties this week.

Sunday, October 17, 2010

Tabletop Witch's Hat

Here's a fun, different idea from the traditional Halloween decorations- a Tabletop Witch's Hat.

Got an old pattern for a witch's hat laying around? If not, go online and find one! I wanted mine to be slightly nontraditional, so I used jean fabric.


Sew the triangles together and turn right side out.

This is where I went "off pattern." Instead of following the pattern, cut a long strip of fabric.

Fold it in half and sew it together the long way, pleating it as you go.


Pin the pleated hat brim to the hat.


Sew it on.

This is what it should look like so far.

Cut a piece of felt that will fit the opening of the hat.


Pin the felt in place, leaving an opening large enough for your hand to stuff the stuffing.

Sew the felt on part way, again, still leaving the opening. Then stuff the stuffing in nice and tight.

Sew the rest of the way closed. It doesn't matter what the seams look like, since this side will be facing down.

Paint the hat all over with black paint and let dry.

Sand in various areas to age the denim.

Tea stain some cheesecloth strips. Then tie onto your hat.

Add in some dried flowers.

And you know what they say.. if the shoe- er... hat fits...


I will be linking to these parties!

AND, join me tomorrow for an extra special giveaway for Red Heads Craft More Fun's First Birthday!!

Sunday, October 3, 2010

Day of the Dead - Part One

As a Spanish teacher, I enjoy learning about Dia de los Muertos (Day of the Dead). As a Halloween-loving human being, I enjoy anything skeletal/creepy during the month of October. Put the two together and it makes for a *spook*tacular combination. You may remember my teaser a few weeks back, and I have been really excited to share this with you, so here goes!

The initial inspiration for this project came from my Aunt Sue, who saw it in a crafting magazine. We ended up changing it up quite a bit in the end.

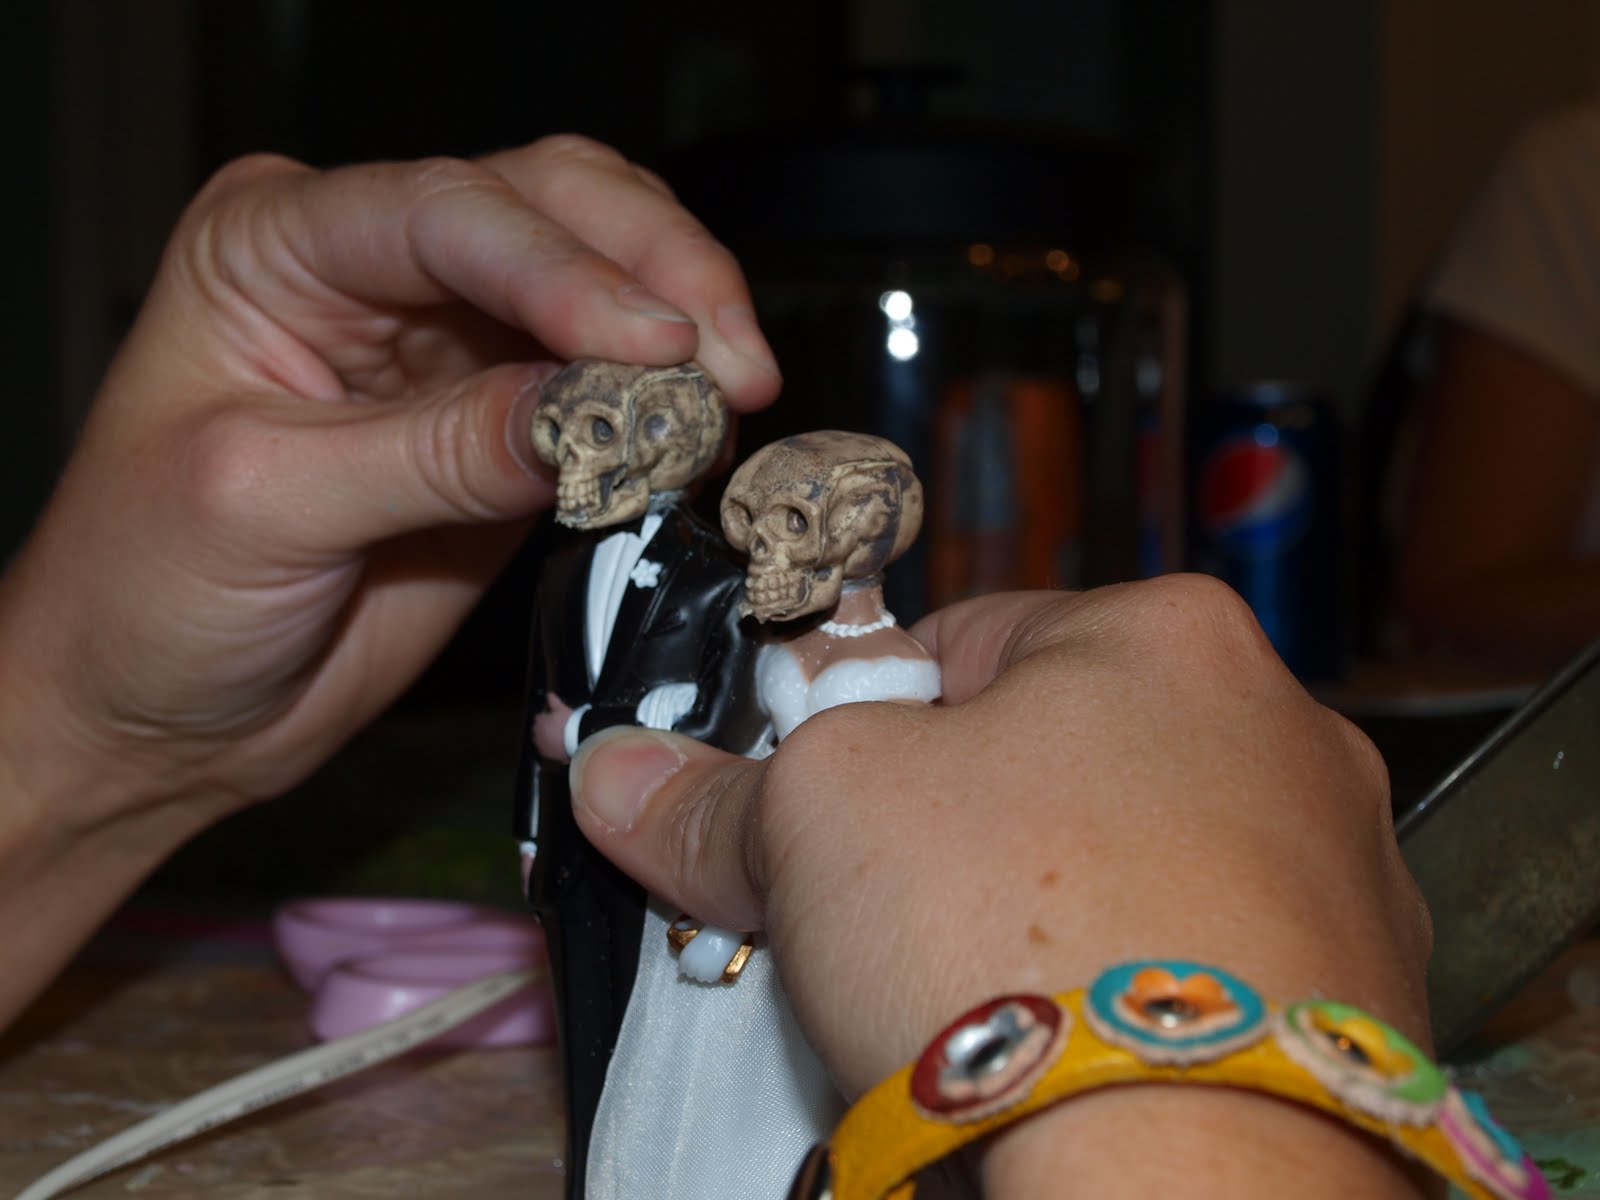
I know it sounds weird, but, start with a wedding cake topper and a hacksaw. (Yikes! I am smiling as I type this.)


Don't worry, this Bride and Groom are having so much fun, they won't even realize their heads are falling off...

Now take some skeletons (available at Michael's and The Dollar Tree) and chop away some more. The following picture looks like a scene out of a scary movie.

Hot glue the skeleton heads onto the Bride and Groom's bodies.

Be careful, they fall off very easily!

Next, use your fingers to put modeling clay all over your figurines and let it dry completely.

I wanted to add some fake flowers to my lady's dress, so I stuck them into the modeling clay. If I did it again, I would have just hot glued them on, they would have stayed better.

After that, I spritzed mine very lightly with a bit of white spray paint.

When the spray paint is dry, I used some stencil paints to color in my people. I used some browns, grays and even a blue for the Groom's tux.

Paint on some bone details to their hands, chests and teeth with white. Now you have one ghouly groom and bride!


You can stop here and put your creepy couple on display, or you can join me next weekend for part two, to see how I am displaying mine. I will also have three other versions to show you since my Mom, Aunt and cousin all made one. Until then, our Bride and Groom will have to live Hauntingly Ever After...

I will be linking to these parties this week.

Sunday, November 1, 2009

Halloween Hot Dog

What a terrific Halloween night! Inspector Gadget and Cleopatra had a wonderful time with their little hot dog, Tulah.


Normally, Tulah would be all about the hot dogs, but apparently, wearing one is not as fun as eating one. This was not her favorite costume, but all of the little ghosts and goblins sure did enjoy seeing her at the door.

Saturday, October 31, 2009

Happy Halloween

I am sitting here dressed as Cleopatra, with a Hot Dog at my side (literally- my dog, dressed up as a hot dog) waiting for trick-or-treaters before we go to a church Halloween party. I can't help but think about how cute my mantel finally turned out for this spooky season. Here are a few photos of what I am looking at. A detailed explanation of the "31" picture and the white pumpkins I made will be coming shortly.

Alas, it is hot here in the Egypt desert, so I will keep my loyal followers waiting no more. Not quite a soaring pyramid, but totally awesome nonetheless.


White Pumpkins

They are finally done! Just in time for Halloween! I am completely intrigued with white pumpkins. I absolutely think they are adorable and whenever I see them at the Farmer's Market, or in the stores I want one and I want it to love forever. I first saw them become immortalized at Shanty2Chic. And I love the way mine turned out!! (Thanks for the idea, ladies.)

Related Posts with Thumbnails