Home  |  As Featured On  |  Advertising  |  Parties I Like!  |  Contact Me  |  About  |  Shop


Showing posts with label mom. Show all posts

Sunday, December 4, 2011

Joy Banner

My Mom and I wanted to add some color to our Christmas decor so we went to the fabric store and came home with these.

We traced and cut out a pennant shape.

Then we made a stencil out of chipboard for the word "Joy". (Cricut Doodletype Font.)

We traced the stencil onto red burlap and cut out each of the letters.

We also cut out squares of regular burlap and sewed the letters on with a zig zag stitch.

We wanted to add a little tree to each side, so we attached that to the burlap too. (We freehanded the tree, didn't use the Cricut on this one.)

Time to lay out the banner and put it together.

We used bias tape to go across the top.

Here she is up on the Thanksgiving mantel. (I haven't decorated for Christmas yet- gasp!)

I'll be linking to these parties this week. Have a great one!

Sunday, November 13, 2011

Where have I been??

Ok, ok, ok, I KNOW it has been awhile since I posted last, like yes, a whole month! So what in the world is my great excuse. (I always tell my students I am happy to listen to their great excuses, but it doesn't mean I will believe them.) So yes, my great excuse as to where I have been these past few weeks is as follows:

My Aunt and I decided to do a craft show! Let me tell you. They. are. a lot. of. work. Oh my. But it was so fun! So, between getting things ready for the craft show, working full time, and conferences at school, I was one busy lady. It was well worth it. My Mom and bestie/cousin were HUGE helps too!

Here are a few pics of our booth.


If you are interested in learning more about our little side project, click here. As soon as my Aunt gets her website up and running, I will pass that info along as well.

Oh, and thanks for being patient while I try out this new endeavor. I am not giving up on Red Heads Craft More Fun and I can't wait to show you some of the cool things I have been making. Thanks for stopping by and can I just say, it's good to be back!

Sunday, July 24, 2011

Pegboard Update

I've had this pegboard around for as long as I can remember. My Mom and I painted it for one of my first apartments when I finished college. Now I have hanging up by our back door to hang coats and bags on. I just thought it could use a little update though. This is how she turned out... what a beauty!


I used my Silhouette to cut out the stencil for the numbers.

I measured and spaced out the stencils because I am crazy like that.

Begin stenciling.

Let it all dry.

Hang it back up!
It's a great home for my market bag!


I'm going to link to these parties this week.

Sunday, April 24, 2011

Market Bag (Recycled Coffee Bean Bag)

Every now and then, there comes a project that does not go as planned. Perhaps it is a project like the apron I made, where it takes A LOT longer than expected.

Case in point, about a month ago my Mom, Aunt and I tackled another sewing project. (I think we are going for one epic sewing project a year.) We made market bags out of recycled coffee bean bags and used pillow cases to line them. Please don't laugh if this sounds easy to you or if you are able to produce a market bag an hour. (Ok, I guess you can laugh a little bit- hehehe!) It may have taken us a few evenings of work, but I just love a project that uses your whole brain to figure out how exactly to do it. I think they turned out great. What do you think? They are nice and spacious and will fit everything the Farmer's Market has to offer!


I'll be linking to these parties this week.

Sunday, December 19, 2010

PB Christmas Apothecary Jar

I told you recently that I had one more Pottery Barn knock-off to show you. This one has a few components to it. First, you need to find an apothecary jar. I got mine at Michael's with a 50% off coupon. My mom found hers at JoAnn's with a 50% off coupon. We both got them for around $14. That already beats the PB priced version at $69.

This was our inspiration picture straight out of the PB manual, er, I mean catalogue.

Next, you need to glitter some birds. The "German Glitter Bird Vase Filler" at PB weren't really that outrageously priced, but the principle of the matter is you can't just order them when you can make them yourself. I will write a tutorial on how we made ours and try to get it up later this week.

Then you make the cute little "Paper Music Star Vase Filler." This is easier said than done. Permission granted to just buy the darn paper stars at PB, I mean seriously, mine did not turn out half as good, and my time was worth more. But my Mom and I had some awesome laughs at how our "Epic fails" turned out. And you know who was actually good at making these? The hubster! Yup, you heard me, he saw me doing some "origami" and he took one try and his turned out way better than mine! (There will be no tutorial on how to make the paper stars. I went to this website and tried my best. Best of luck to you there!)

Then you throw it all together and wish for the best. Now if only I had mad PB photographer skillz to know how to photograph my version with perfect light so that you could see perfectly into the glass jar.

I also added a cute white velvet ribbon bow to the top of mine.

The star shaped glitter ornaments with all the points on them are from Walmart. $1 each, so I figured it was worth it instead of making them.


Moral of the story is that this one might have been better off left to the professionals (aka PB), but I took a good try. Happy Holidays!

PS: If I feel like it, I am going to link to these parties, will you please join me?

Sunday, December 12, 2010

Christmas Tree with Vintage Buttons

My Mom has a GIANT collection of buttons! A lot of them are really cool vintage buttons. This year, we decided to make button Christmas trees.

We started with frames and painted them bright red. Then cut out scrapbook paper to use as the background. Place the buttons in the shape of the tree and the scrabble tiles for the base. They are so simple and cute!


I will be linking to these parties this week. Happy holidays!

Sunday, October 3, 2010

Day of the Dead - Part One

As a Spanish teacher, I enjoy learning about Dia de los Muertos (Day of the Dead). As a Halloween-loving human being, I enjoy anything skeletal/creepy during the month of October. Put the two together and it makes for a *spook*tacular combination. You may remember my teaser a few weeks back, and I have been really excited to share this with you, so here goes!

The initial inspiration for this project came from my Aunt Sue, who saw it in a crafting magazine. We ended up changing it up quite a bit in the end.

I know it sounds weird, but, start with a wedding cake topper and a hacksaw. (Yikes! I am smiling as I type this.)


Don't worry, this Bride and Groom are having so much fun, they won't even realize their heads are falling off...

Now take some skeletons (available at Michael's and The Dollar Tree) and chop away some more. The following picture looks like a scene out of a scary movie.

Hot glue the skeleton heads onto the Bride and Groom's bodies.

Be careful, they fall off very easily!

Next, use your fingers to put modeling clay all over your figurines and let it dry completely.

I wanted to add some fake flowers to my lady's dress, so I stuck them into the modeling clay. If I did it again, I would have just hot glued them on, they would have stayed better.

After that, I spritzed mine very lightly with a bit of white spray paint.

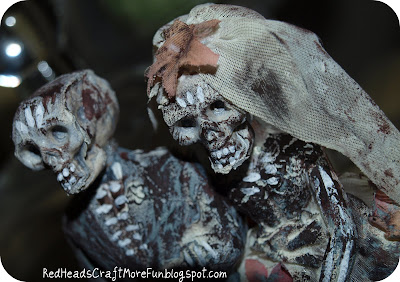
When the spray paint is dry, I used some stencil paints to color in my people. I used some browns, grays and even a blue for the Groom's tux.

Paint on some bone details to their hands, chests and teeth with white. Now you have one ghouly groom and bride!


You can stop here and put your creepy couple on display, or you can join me next weekend for part two, to see how I am displaying mine. I will also have three other versions to show you since my Mom, Aunt and cousin all made one. Until then, our Bride and Groom will have to live Hauntingly Ever After...

I will be linking to these parties this week.

Sunday, September 19, 2010

Red Chair Makeover

I have been fixing up a crafty area in my house for awhile now. I decided I needed to refinish a chair that I could set things on sit in when I craft.

I found this old chair at a Salvation Army.

I removed the cushion and sanded the chair.

I wanted to paint it a glossy red color.

I put a couple coats on it...

While that was drying, I ripped off the old cushion.

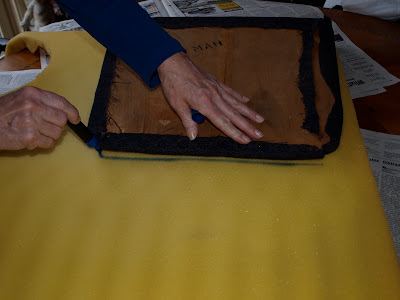
I traced it on the new (recycled) foam I was going to use. (My mom helped me, thanks Mom!)

Here are all the layers.

Time to staple everything together.

Trim it up.

Staple on the fabric.

Trim it up again.

Put it all back together.


A lovely place to sit.

Related Posts with Thumbnails