Home  |  As Featured On  |  Advertising  |  Parties I Like!  |  Contact Me  |  About  |  Shop


Showing posts with label sewing. Show all posts

Sunday, March 11, 2012

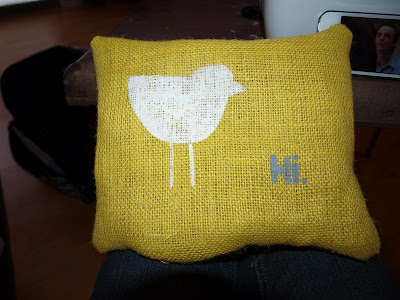
Hello Birdie.

Did you know they make yellow burlap? Amazing! When I saw it, I knew exactly what I had to do. I made a pillow.

You can cut your burlap to whatever size you want. Mine was pretty small, like 6"x9"ish.

I then created a stencil using my Silhouette.

I stenciled it on using white and grey.

I put the right sides of my pillow together and sewed around it, leaving an opening so that I could stuff it. Don't forget to clip the corners.

I then stuffed my pillow with grocery bags (recycled material) and finished sewing it closed.

I made it as a gift to my bestie. She and I took a chair reupholstery class and she wanted to put it on her chair. It's super cute. Look how adorable her chair turned out!


I'll be linking to these parties this week. Spring is in the air!!

Sunday, December 4, 2011

Joy Banner

My Mom and I wanted to add some color to our Christmas decor so we went to the fabric store and came home with these.

We traced and cut out a pennant shape.

Then we made a stencil out of chipboard for the word "Joy". (Cricut Doodletype Font.)

We traced the stencil onto red burlap and cut out each of the letters.

We also cut out squares of regular burlap and sewed the letters on with a zig zag stitch.

We wanted to add a little tree to each side, so we attached that to the burlap too. (We freehanded the tree, didn't use the Cricut on this one.)

Time to lay out the banner and put it together.

We used bias tape to go across the top.

Here she is up on the Thanksgiving mantel. (I haven't decorated for Christmas yet- gasp!)

I'll be linking to these parties this week. Have a great one!

Sunday, April 24, 2011

Market Bag (Recycled Coffee Bean Bag)

Every now and then, there comes a project that does not go as planned. Perhaps it is a project like the apron I made, where it takes A LOT longer than expected.

Case in point, about a month ago my Mom, Aunt and I tackled another sewing project. (I think we are going for one epic sewing project a year.) We made market bags out of recycled coffee bean bags and used pillow cases to line them. Please don't laugh if this sounds easy to you or if you are able to produce a market bag an hour. (Ok, I guess you can laugh a little bit- hehehe!) It may have taken us a few evenings of work, but I just love a project that uses your whole brain to figure out how exactly to do it. I think they turned out great. What do you think? They are nice and spacious and will fit everything the Farmer's Market has to offer!


I'll be linking to these parties this week.

Sunday, April 17, 2011

eReader Case

I have a Nook coming in the mail! I scored an awesome deal on it! I am excited and we all know that with a new 'toy' means you have to get all of the accessories. Upon perusing the merchandise available online, I decided I didn't like any of the cases, so I had to make one!

I was going to wing it and figure out something, but without the Nook actually being in my possession, it would have been hard to do. I couldn't find many free patterns online, but I did come across this pattern from Birdful Stitches on Etsy.

I was nervous to try it (it was my first solo pattern sewing project), and after only 2 mistakes (nothing severe or too major), I was pleased with the end results.


It even has an extra pocket that will come in handy!

Someone got jealous of the attention that case was getting. Mental note on first Nook Book purchase: "How to Train the Untrainable"

Now let's hope the Nook actually fits in it! :o)

I will be linking to these parties this week. Have a wonderful week!

Sunday, March 27, 2011

Coffee Pot Coaster

Remember how we just finished painting our countertops? Well, now we are obsessed with protecting them. Whenever the Hubby makes coffee, he tries to pull out the coffee maker and it scrapes across the countertop. I decided to remedy that problem. I made a coffee pot coaster. It takes like maybe 10 minutes and just a scrap of fabric.

I started by making a pattern out of paper under my coffee pot. I eyeballed it to the size I wanted. No rocket science here.

Fold your scrap fabric in half and use your paper pattern to check for the size.

Cut it out.

I also cut a piece of batting to put in the coaster for extra protection.

Sew the two pieces of fabric right sides together with the batting using a 1/4" to 1/2" seam allowance. Leave one side partially open so you can turn it right side out.

Trim the corners and then turn right side out and pin opening.

Top stitch all the way around the entire square, closing the space you just pinned.

And there you have it! A cute, practical decoration for your kitchen!


PS: Did you notice I used the leftover fabric from this project?

I will link to these parties this week!

Sunday, February 20, 2011

Quatrefoil Sewing Caddy

Last summer I went to an estate sale where I found a cool, old sewing caddy. It started out looking like this...

After bargaining for the price, I cleaned it up and painted it heirloom white. I liked it and thought it looked cute, but it still needed something.

I remembered seeing a printable stencil over at Tatertots and Jello, and I knew what I needed to do.

I stenciled the sides of the sewing caddy to match my craft room!

I still need to do a second coat and erase my stencil tracing lines, but I like the way it's going! Do you think I should stencil it all over or just leave it on the ends? I am conflicted. Thanks again to Jen at Tatertots and Jello for her (awesome) quatrefoil obsession.


I will be linking to these parties this week.

Sunday, January 16, 2011

Coupon Organizer

Are you one of the many people trying to get organized in January?? Here is a helpful idea that works for me - a fabric envelope. I use it in my purse to carry coupons. It is simple, only uses a scrap piece of fabric, and it's reusable! (Yay environment!)

I started with a scrap piece of fabric. I cut 2 strips and just eyeballed it without any measuring. You can make it any size you want it. I folded up what will become the bottom of the envelope, just to see the size.

I wanted my envelope to have a curved flap, so I used a plate to trace the curve. I then cut around the curve with my rotary cutter.

I pinned the two pieces of fabric with the right sides together and sewed all around it, leaving a little opening to turn it right side out.

Here it is right side out, and sew the little opening closed.

Pin the bottom and sew up the sides.

Attach a button and you have a fabric envelope! (I actually cheated- I used a snap to close the envelope and just hot glued my button to the front. Don't judge, I made this when I first started sewing and I hadn't met the button hole function on my sewing machine yet!)

This results in a super cute way to get your purse organized. How cute would it be to make one of these and throw a gift card inside as a little gift for someone? Oh the ideas are endless...

I will link up to these parties this week.

Sunday, January 9, 2011

DIY Dog Leash

In honor of our new little doggie Choco, this past Christmas I decided to count in man's best friend on the nice list. I made some dog leashes and they were SO quick and easy! This would make a great gift for a new dog owner, a doggie birthday or file it away for another Christmas.

You will need some ribbon, webbing and a dog leash hook thing. There are a few ways you can get the hooks. One, go to a hardware store, they sell them there. Two, go to the dollar store, buy a leash and cut it apart (this works well for small dogs). Or three, do what I did, find the hooks at Goodwill for like .50, buy them, hold onto them for a year and then hunt them down to make a leash.


I did two different versions of the leash, so that's why you will see different webbing and ribbon in some pictures.

Begin by pinning the ribbon down the length of the webbing. I believe my webbing was about 3 yards long, but you can chose your own length depending on how long you want the leash to be.

Carefully sew as close to the edge of the ribbon as possible, all the way down the length.

After you have sewn along both sides of the ribbon, fold over one side to make the handle of the leash.

Sew and reinforce.

At the other end of the leash, sew and reinforce the hook onto the webbing.

And there you have a dog leash! It takes like 10 minutes!!


And some doggies to model the leashes!


I will be linking to these parties this week- hope to see you there!
Related Posts with Thumbnails