Home  |  As Featured On  |  Advertising  |  Parties I Like!  |  Contact Me  |  About  |  Shop


Showing posts with label gift. Show all posts

Sunday, January 9, 2011

DIY Dog Leash

In honor of our new little doggie Choco, this past Christmas I decided to count in man's best friend on the nice list. I made some dog leashes and they were SO quick and easy! This would make a great gift for a new dog owner, a doggie birthday or file it away for another Christmas.

You will need some ribbon, webbing and a dog leash hook thing. There are a few ways you can get the hooks. One, go to a hardware store, they sell them there. Two, go to the dollar store, buy a leash and cut it apart (this works well for small dogs). Or three, do what I did, find the hooks at Goodwill for like .50, buy them, hold onto them for a year and then hunt them down to make a leash.


I did two different versions of the leash, so that's why you will see different webbing and ribbon in some pictures.

Begin by pinning the ribbon down the length of the webbing. I believe my webbing was about 3 yards long, but you can chose your own length depending on how long you want the leash to be.

Carefully sew as close to the edge of the ribbon as possible, all the way down the length.

After you have sewn along both sides of the ribbon, fold over one side to make the handle of the leash.

Sew and reinforce.

At the other end of the leash, sew and reinforce the hook onto the webbing.

And there you have a dog leash! It takes like 10 minutes!!


And some doggies to model the leashes!


I will be linking to these parties this week- hope to see you there!

Sunday, September 12, 2010

Custom Made Envelopes

I love writing notes. I used to write notes all the time for my parents and leave them in fun places and now I do it for my husband. I would even make little envelopes to put them in. The other day, I made a card for my friend's birthday (Happy birthday Anne!), but I realized I didn't have an envelope to send it in. That's when I thought I could make one.

1. I found a nice page out of a magazine and began to fold.

2. Fold one side of the paper over about an inch, then slip the card to that side.

3. Then fold the right side over the top (it will probably hang over).

4. Trim off the excess paper that was hanging over.

5. Unfold everything and fold up the bottom.

6. Trim the top of the envelope, but not all the way (this is going to be the flap of the envelope. If you are unsure, check out the next pic before cutting.

7. This is the rough template you are going for.

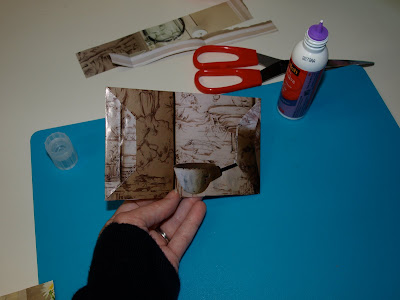
8. Put the card back into the "envelope."

9. Put some glue on the left side.

10. Press closed.

11. Fold up the bottom like you are wrapping a gift.

12. Use some glue to secure the bottom.

13. At this point make sure your card is really in the envelope. Then fold the top flap just like you did the bottom.

14. Here is a picture of what the back looks like.

15. Find another piece of paper or a label to put on the front and address it to the lucky recipient.


What a great way to recycle some old magazine pages and spread some cheer!

I will be linking up to these parties this week.

Oh, and Anne, if you are reading this, your card is a little late, but I hope you had a great birthday today!!

Sunday, September 5, 2010

Golf Towel

This summer, the hubby got new golf clubs. Lucky Man! So, when he asked me to make him a golf towel to go with the new clubs, how could I resist a new sewing challenge?

Off to JoAnn's we went so that he could pick out the fabric of his choice. He found a brown terry cloth, and a stripped one to match.

I used an old dish towel and the hubby's eyeballs as a guide for how big to cut my pieces. I put my pieces right side together and sewed all around them with a 1/2" seam allowance (you can use any seam allowance). Don't forget to leave a small opening to turn it right-side out.

Here is a picture of it while it is still inside out:

Don't forget to trim your corners. At this point I may have forgotten to take a picture due to the fact that when I trimmed my corners, I also trimmed off the tip of my thumb. Never fear, it has healed and feels a lot better!

At this point, turn it all right-side out and push out your corners. Sew the opening closed, and you will notice your towel billows because it is two layers. What I decided to do was to sew down all the brown stripes the length of the towel. This holds the two layers together. If you use fabric that is not like mine, your stitches will show. This wouldn't bother me, but I wanted to let you know in advance in case something like that bothers you. I used brown thread, so my stitches don't show. Another option would be to sew a giant "X" shape on the whole towel.

Now it is time to add the grommet. Puncture a hole in the fabric and put your grommet pieces together and hammer.

We weren't sure what to use to attach the towel to the golf bag, but I found one of these old binder rings, and that did the trick.

Hubby liked the golf towel so much, that I ended up making one for his dad (my father-in-law). Talk about a great Father's Day gift too.


Happy swinging!

I will be linking up to these parties this week.

Sunday, August 8, 2010

Lollipop Soap

This past weekend, I had a baby shower for one of my really good friends. The theme was *Sweet Treats*. It was a dessert shower and despite the fact that I gained some good old l-b-s's (aka: pounds), the party favor did NOT make me gain any. Check these out!


Don't they look good enough to eat wash your hands with?? They were so easy to make.

Here is a picture of what you will need:
Clear glycerin soap from Hobby Lobby, scent oil, coloring, a cookie pan and lollipop sticks. You will also want a spritzer bottle with rubbing alcohol in it.

Start out by putting the soap into a microwave safe container, I microwaved it for 1 minute the first time at half power, then 30 seconds at half power until melted. You do not want it to boil.

This is what it looks like all melted. If you see little bubbles, spritz in some rubbing alcohol and the bubbles magically disappear!

Add in your coloring. A little goes a long way and you can always add more. Stir it up really good and spritz more alcohol if you see bubbles.

Then add your scent. As much or as little as you want. Stir it up good and spritz more alcohol if you see bubbles. Slowly pour into your mold. If bubbles appear, what do you do? Spritz alcohol!


Let them cool and then pull them away from the mold. They weren't hard to remove, but if the stick wiggles too much, they aren't cool enough, give 'em more time.

Like I said, I used these as party favors, but they would make excellent house-warming gifts, holiday gifts, Mother's Day gifts, etc. Don't forgot to include a little note with them that reminds people not to eat the soap. Mine said something like, "Please enjoy, but do not lick- For eating soap can make you sick!"

I will be posting to these parties this week.

Monday, July 19, 2010

Pedestal Jewelry Boxes

For Christmas, my six-year-old cousin got a vanity table, that she loved. So I decided that for her birthday, I would make her some jewelry boxes to go on her vanity table. They turned out so cute!

Here is a picture of some of the supplies you will need: Some candlesticks; some acorn dowel heads (which will become the handle for the lid); a little box (I used 3 different sizes). You will also need some glue, craft paint, and wooden circles (not pictured below, I will show you later).

Paint everything. I used a fun purple, pink, orange, and blue color. This is a great way to customize the look for the gift recipient, use her favorite colors, or make it match her bedroom or vanity.

Then assemble it all together and glue it. I used hot glue to put it all together.

In this picture, you can see I added polka-dots, and notice the wooden disc at the bottom. They came in a package in the unfinished wood section at the store. I thought I took a picture of them, but I guess I didn't! Anyway, that is also just glued on.

I love the "chunky" blue one!

Here's the finished grouping of three. This little girl is going to *love* to store all of her beads and trinkets in her boxes!

I have also seen these boxes in heart shapes, star shapes, bigger, smaller, etc., so have fun playing around with the variations. I also thought they might make a great alternative to a tooth fairy pillow! I'm sure there are endless possibilities.

I will be linking up to these great parties!

Related Posts with Thumbnails